Getting started with Jupiter Day
Your first day: sign in, set yourself up, put it on your phone, and find your way around.
Jupiter Day runs your business from one list of tasks. Everything else — notes, chat, customers, alerts — feeds that list or comes out of it. This guide takes you from signing in to a working set-up on your computer and your phone. Allow about fifteen minutes.
Positions in this guide are described for a computer screen. Where a phone is different, we say so.
1. Sign in
- Go to jupiter-day.com and click
Log in— it is in the top right-hand corner of the page, just left of the orangeStart freebutton. - Type the email address your team invited you with (or the one you signed up with) and click
Email me a code. - Open your email. You will have a message from Jupiter Day containing an eight-digit sign-in code. Type it into the
Sign-in codebox and clickSign in.
There is no password to remember: Jupiter Day emails you a fresh code each time. If you prefer, click Use a password instead under the form, or Continue with Google at the top of it.
Note. If you were invited by email, open the invitation first and follow its link — that joins you to your team's workspace before you sign in.
2. Set yourself up (once, in this order)
2.1 Add your photo and name
New users have no photo yet, so the circle at the far right-hand end of the top bar shows the first letter of your name. Your teammates see that letter on every task and message until you add a photo.
- Click the circle at the far right of the top bar. A small menu opens.
- Click your name's Area (it says
Ross's Areafor Ross,Priya's Areafor Priya, and so on). - You land on the
Youtab — it is the first item in the menu down the left-hand side. - Click
Upload a photo(to the right of the circle). Choose a JPEG, PNG, WebP or GIF up to 2 MB. Only people in your workspaces can see it. - Fill in
Preferred name(what the app calls you — usually your first name),Full name(how you appear to teammates),Job titleandPhone. - Check
Time zone. It is set from your computer; it decides when due times and alerts land. - Click
Save changesat the bottom of the card.
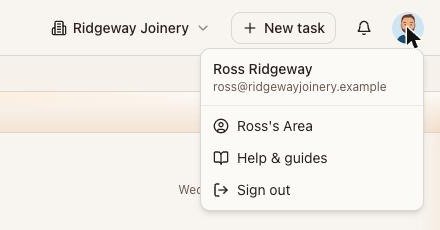
The menu behind your photo (top right): your Area, Help & guides, Sign out.
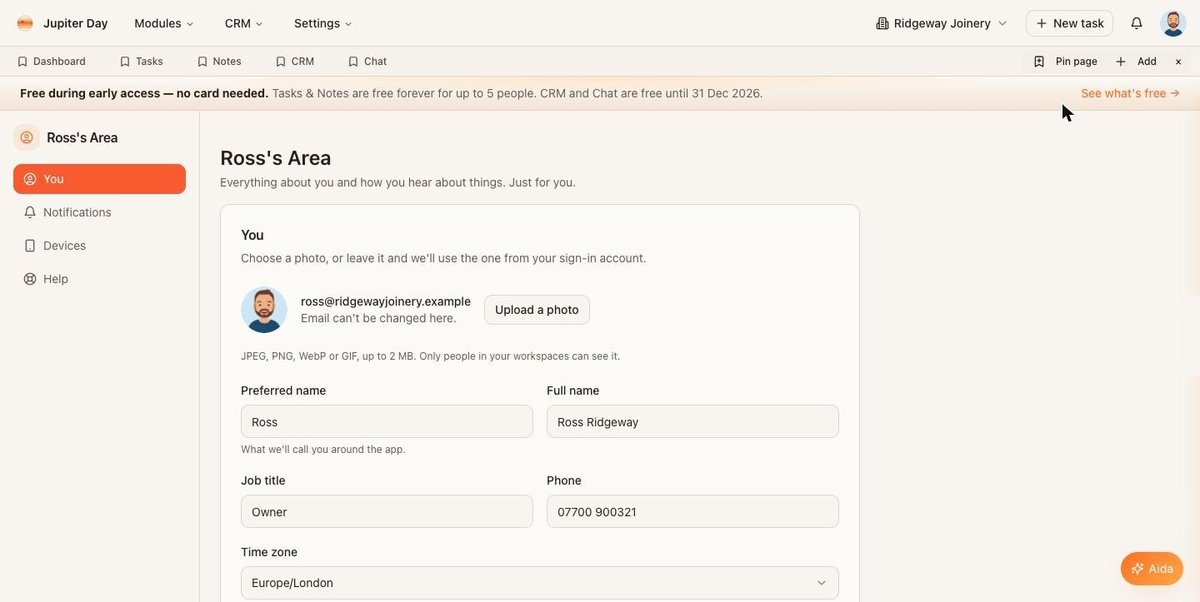
Your Area › You: photo, names, job title, phone and time zone.
2.2 Choose how you are told about things
Still in your Area, click Notifications in the left-hand menu. Every kind of event has a row — a task assigned to you, a task due tomorrow, a mention in chat, an approval — with three controls:
Bell— show it in the bell at the top of the app.Phone— send an alert to your phone or computer (only works once you have switched alerts on for that device — step 2.4).- The drop-down on the right — email
Straight away,In the daily round-up, orNo email.
On day one leave the defaults as they are. Come back after a week and turn down anything that is noise.
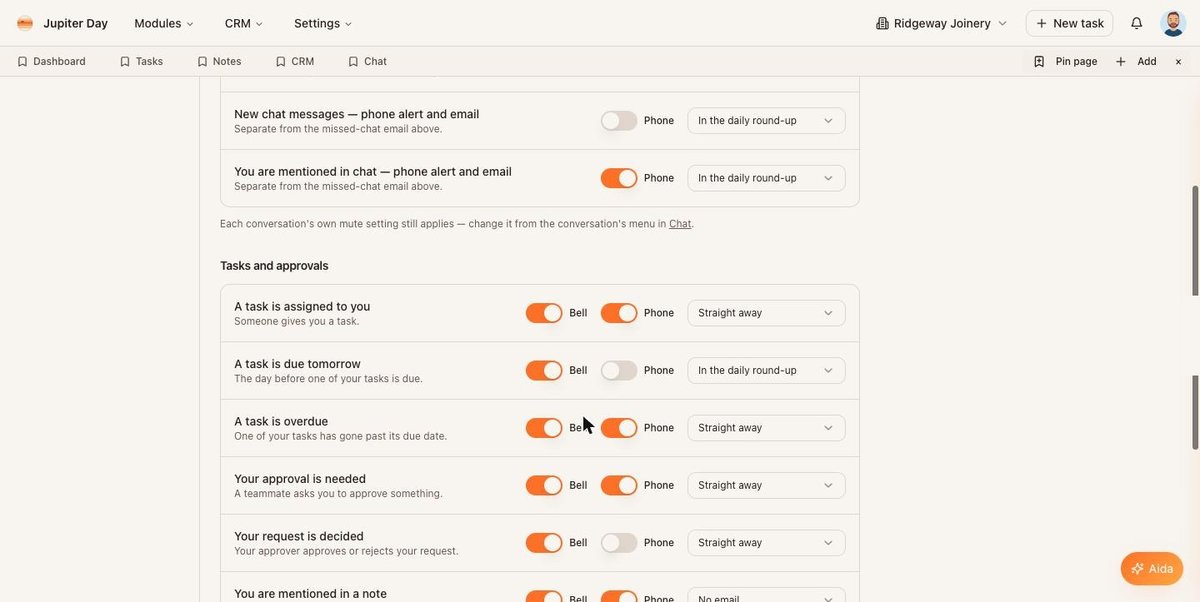
Your Area › Notifications: one row per event, with Bell, Phone and Email controls.
2.3 Put Jupiter Day on your phone
Jupiter Day works as an app on your phone: it opens in its own window from an icon on the home screen, and it can alert you when it is closed. You set it up from your computer.
- In your Area, click
Devicesin the left-hand menu. - Find the card
Add Jupiter Day to your phone. It shows a square QR code. - Point your phone's camera at the code and tap the link that appears. The Jupiter Day sign-in page opens on your phone with your email already filled in.
- Tap
Email me a code, open your email on the phone, and type the eight-digit code from the message. TapSign in. - Now add it to your home screen. iPhone: tap the Share button in Safari (the square with an arrow pointing up, in the middle of the bar at the bottom of the screen), scroll down and tap
Add to Home Screen, thenAdd. Android: tap the three-dot menu in the top right of Chrome and chooseAdd to Home screenorInstall app. - Open Jupiter Day from the new icon. On iPhone you will be asked to sign in once more — the home-screen app keeps its own sign-in, so type a fresh emailed code. This only happens once.
What is "the code"? It is the eight-digit sign-in code Jupiter Day emails you — the same one you used in section 1. There is no separate password or PIN. If the code has stopped working, go back and tap Email me a code again for a fresh one.
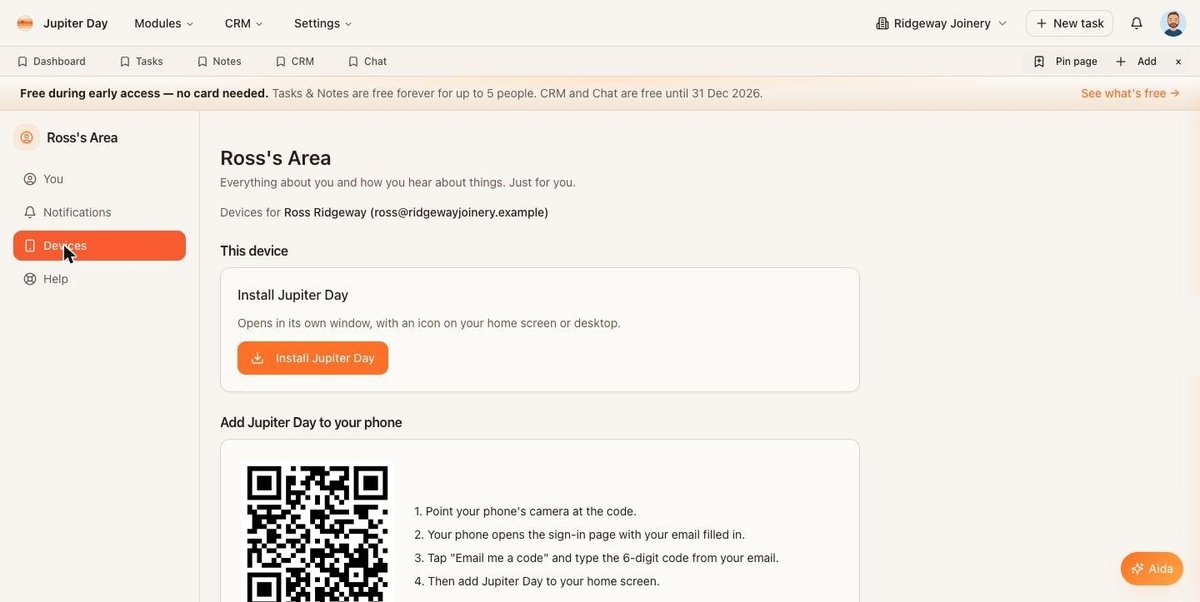
Your Area › Devices: the install card and the QR code for your phone. (The code in this picture is an illustration — the one on your screen is unique to you.)
2.4 Switch on alerts on each device
Alerts are per device. Do this on your phone (from the home-screen app), and on your computer if you want pop-ups there too.
- Open your Area ›
Deviceson the device itself. - Under
Phone alerts, switch onPhone alerts on this device. - When the phone or browser asks whether Jupiter Day may send notifications, tap
Allow.
The list under the switch shows every device that has alerts on, with Remove beside each. If nothing arrives, open Not seeing alerts? on the same page — it shows the fix for the device you are on (on iPhone, alerts only work from the home-screen app, not from Safari).
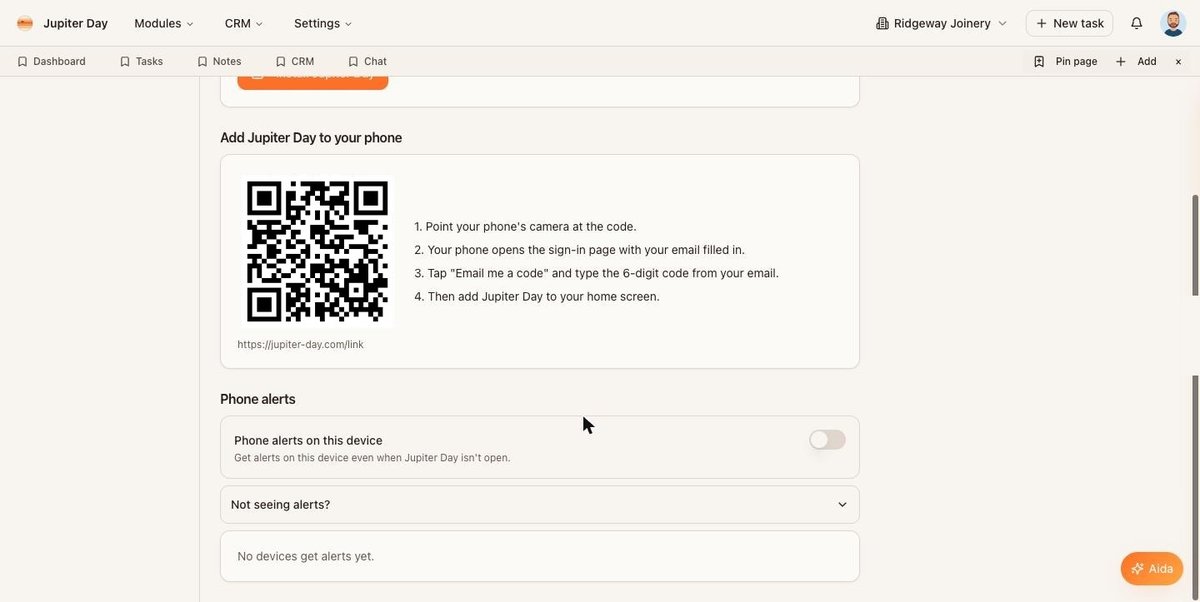
Lower down the Devices page: the phone-alerts switch, the "Not seeing alerts?" help, and your devices.
3. Find your way around
3.1 The top bar
The bar across the top is the same on every page. From left to right:
- Your workspace logo (far left) — click it to go Home.
Modules— a menu of the modules your workspace has switched on: Tasks, Notes, CRM, Chat, Workflows. UnderManage,Browse all modulesis where an owner or admin switches modules on or off.CRM— quick links into the CRM (Leads, Companies, Contacts, Opportunities). This menu only appears when CRM is switched on.Settings— the workspace's settings: team, roles, modules, branding, billing. Only owners and admins see it.- Workspace switcher (right-hand side, the building icon with your workspace name) — if you belong to more than one workspace, click it to move between them.
+ New task— add a task from anywhere.- Light-bulb icon — ask Aida, the assistant.
- Bell — your notifications (section 4).
- Your photo (far right) — your Area, Help & guides, Sign out.

The top bar and, under it, the bookmarks row.
Under the top bar is a row of bookmarks — one-click shortcuts to the pages you use most (Dashboard, Tasks, Notes, CRM, Chat in the picture). It starts empty: open a page you use often and click Pin page at the right-hand end of the row to add it. + Add beside it adds any page by name.
Inside a module, its own menu runs down the left-hand side of the page (for example To do / Assigned to me / Done in Tasks).
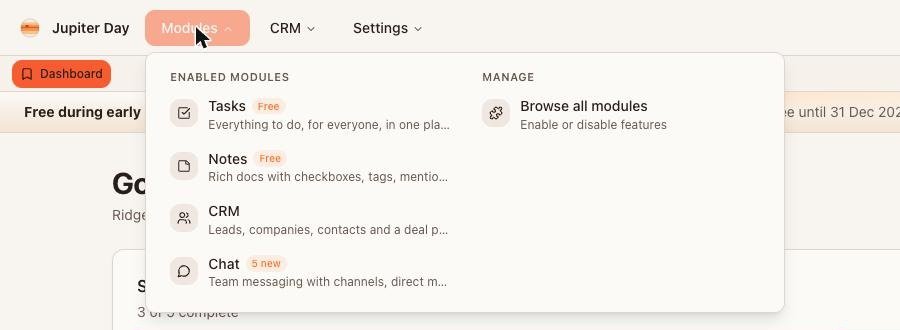
The Modules menu, open.
3.2 Home
Click the workspace logo (top left) or Dashboard in the bookmarks row. Home greets you by name and shows: a set-up checklist (owners and admins, until it is complete); Aida checked — what she noticed since you last looked, with buttons to act on it; Today — tasks due today, conversations waiting and mentions; an Ask Aida box with suggestions; and Your modules at the bottom.
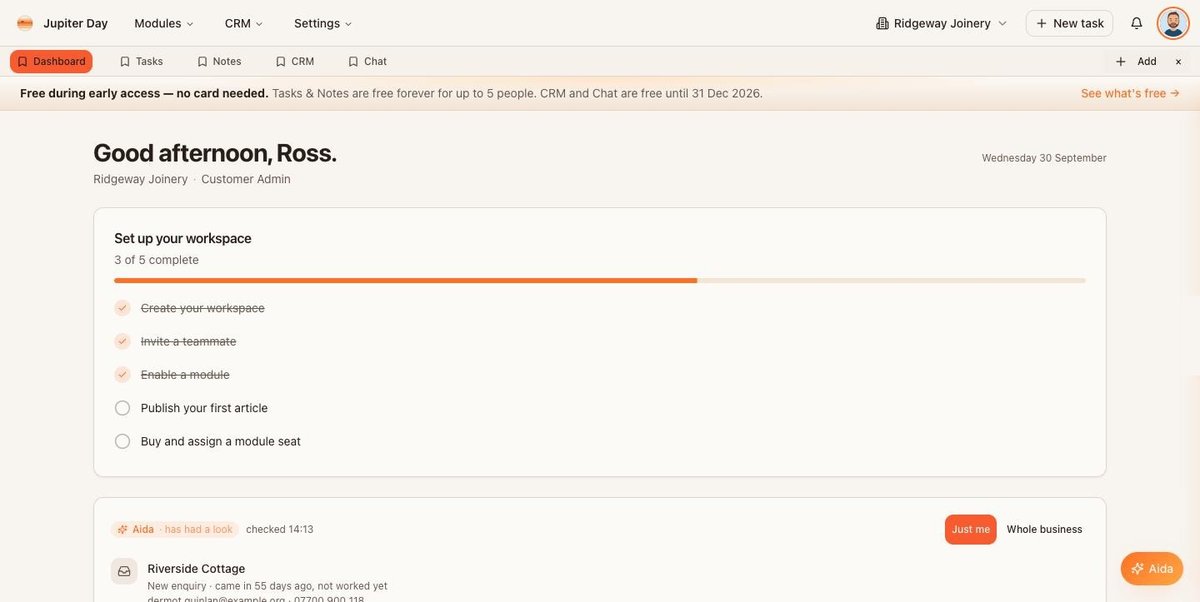
Home: greeting, set-up checklist, Aida's latest check, and Today.
3.3 The modules
Each module is a different kind of work. Your workspace's owner decides which are switched on.
- Tasks (free) — everything to do, for everyone, in one place. Every task has one owner and one date. See the guide Tasks: running your day from one list.
- Notes (free) — pages for meeting notes, plans and checklists, private or shared with the workspace. A line in a note can become a task. See Notes and checklists.
- CRM — leads, companies, contacts and opportunities, with tap-to-call and call logging on your phone.
- Chat — channels and direct messages for your team, with @-mentions that reach people's phones.
- Workflows (free, early access — switched on for a workspace on request) — rules that do routine things for you, written with Aida in plain English and approved by you.
3.4 On your phone
On a phone the layout changes. A bar along the bottom of the screen gives you Today, Tasks, Chat, CRM and Me (your Area). Today is the phone's home page: what is due today and overdue, with a box to add something quickly. At the top: the three-lines menu (far left) opens everything else — Home, My tasks, Notes, the modules, the CRM sections and workspace settings — and the bell and your photo are on the right.
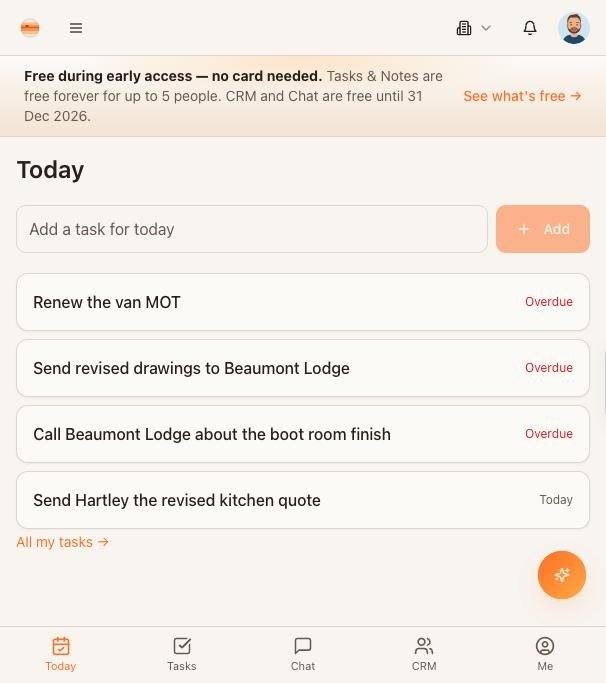
Today on a phone, with the bottom bar.
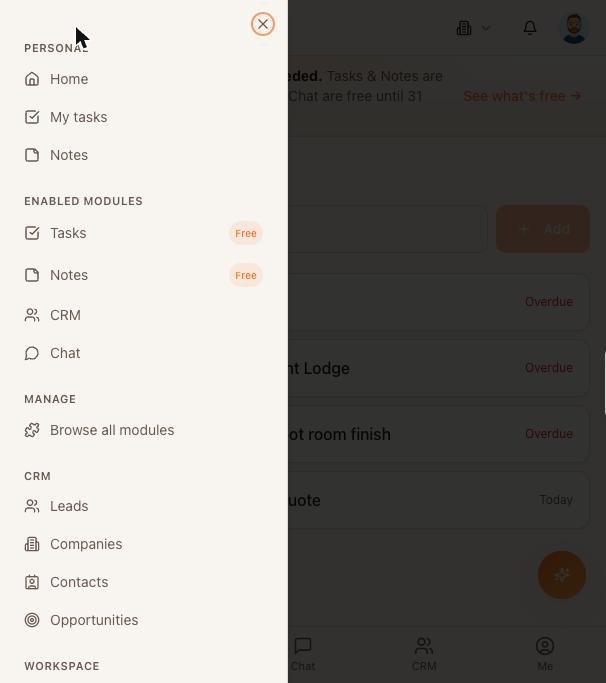
The three-lines menu on a phone: Notes and the other modules live here.
4. The bell
The bell in the top bar shows things that concern you: a task you were given, a mention, an approval waiting, a task due tomorrow. Click it to open the panel. Each item takes you to the thing it is about, and some carry a button so you can act without leaving the panel (for example Mark task done). Mark all read clears the count; the sliders icon next to it opens your Notifications settings.
A notification is a message about something that happened. It never creates a task by itself — the task list only holds work that someone has deliberately put there with an owner and a date.
5. Aida
Aida is the assistant. She reads the same tasks, notes and conversations you can see — nothing more — and tells you what needs attention. Ask her from the light-bulb icon in the top bar, the Ask Aida box on Home, or the orange Aida button in the bottom right-hand corner of most pages. Try Show my tasks for today or What's waiting for me?. Aida suggests; nothing happens until you approve it.
6. A good first hour
- Add three real tasks with a date each — one of them assigned to someone else.
- Open Notes and write down the thing you would otherwise keep in your head.
- If your workspace has Chat, say hello in a channel and @-mention a colleague.
- Close the laptop and check your phone: the mention and the task should be waiting in the bell, and as an alert if you switched them on.
7. Where to find help
Click your photo (top right) and choose Help & guides, or open your Area and click Help in the left-hand menu. The guides live there, and Contact support at the bottom sends a message to a person.
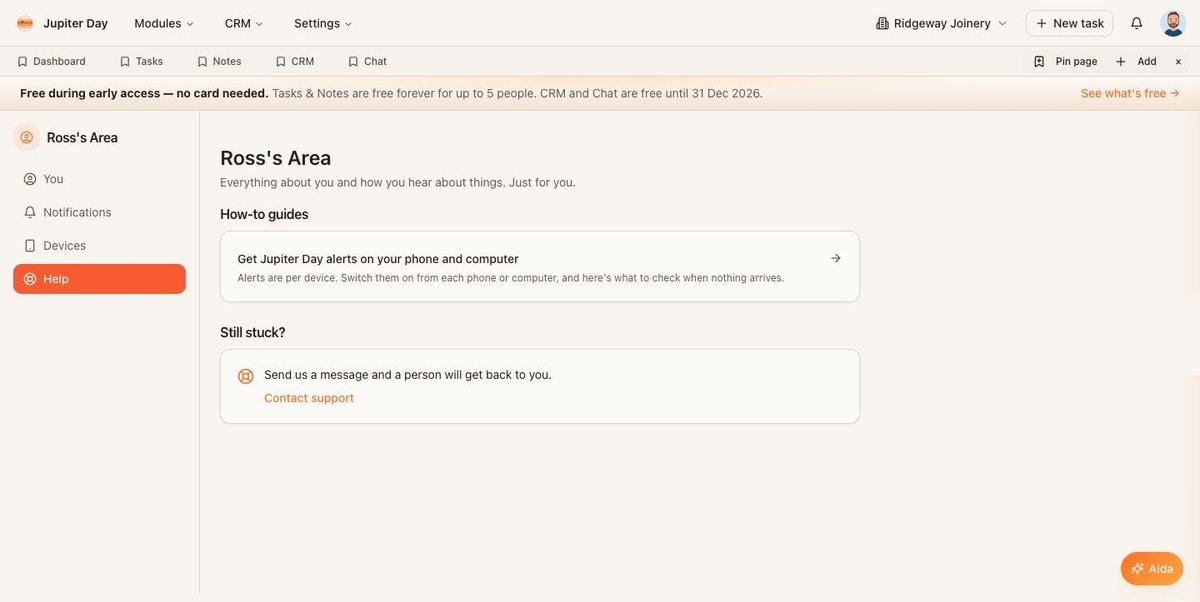
Your Area › Help: the how-to guides and Contact support.